

 A running blog of common (and maybe not so common) issues as I find them, and some additions I made, listed at the bottom of the page.
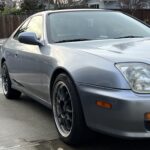
Vehicle: 1999 Honda Prelude (Non-SH) Coupe, BB6
Engine: H22A4
Miles: 128,500
Transmission: Automatic M6HA
Color: Crystal Blue Metallic
A Brief History
I picked up this Prelude in November, 2022. The seller believed the engine needed to be replaced (thanks to one or two local mechanics diagnosing an issue he had with overheating), even to go as far as telling him the engine failed a block test (whereas another shop said it passed).
The car was clean otherwise, and in great shape so I took the risk knowing the possibility of having to replace the head gasket, machine the block/head, or very worst, replace the engine. But from what I learned, it wasn’t ran very long when it started to overheat.

Block Test
You can get an inexpensive combustion leak detection kit from Amazon. You place it in the radiator fill opening, and let the coolant push up into the sampling tube once the engine has warmed up. Then remove it from the radiator (put the cap back on!) and pour the test fluid into the tube. If it changes color according to the instructions, you have exhaust gasses mixing with the coolant. This would indicate a bad head gasket.
Mine passed the block test. Next on to the compression test.
Compression Test
 Again, I picked up an inexpensive compression tester from Amazon. For this test you will need to unplug the harness from the ignition coil so the engine doesn’t during the test. You’ll also need a helping hand to turn the engine over while you watch the gauge.
You’ll do this for each of the 4 cylinders
- Disable the ignition coil by unplugging the power connecter from the bottom and set it aside
- Remove the spark plug
- Thread in the compression tester by hand so it’s snug
- Have a friend turn the engine by turning the key to Start and keep it cranking. The cranking will force pressure from the compression stroke into the gauge, stop turning the engine over when the needle stops moving
- Write down the reading and continue with the next 3 cylinders, write down the result for each one
- Reconnect the spark plug wires and don’t forget to plug the ignition coil back in!
In my case the PSI readings from Cylinders 1 thru 4 were 205-200-205-205, respectively. Which impressed me for being a 20+ year old car. Typical (decent) values should be in the 180 to 210 range.
What’s important is not having high numbers as much as it is having values close together (although higher compression values evenly spread across all cylinders are appreciated).
You want to see [near] even compression across all cylinders. The rule of thumb I learned years ago is that the lowest performing cylinder shouldn’t be more than 10% to 15% (at the very most) of the highest reading cylinder.
For instance, (and I’ll use 100 PSI as the max value, for ease of math) say your numbers were 100-100-85-90. Cylinders 1 and 2 look good, cylinder 3 is 15% of the highest (100 PSI) and Cylinder 4 is 10% (90 PSI) of the highest cylinder. So Cylinder 3 has the lowest compression. That’s not to say the engine is bad, the piston rings might be worn more than the others, or the valves may not be seating correctly due to damage or carbon buildup.
But if one (or more) cylinders is substantially lower than the others, you have an issue that needs to be addressed. See misfiring below.
Misfire
Random misfire was present in Cylinder 1 (P0301 DTC). Started with the easy stuff, replaced spark plugs, (wires and distributor were new), I scoped the spark plug holes with a camera, cylinder 1 had some carbon buildup, the others were quite clean. So I removed the IACV valve, found a lot of carbon buildup on the mesh screen. Same with the EGR, it held vacuum but was caked with carbon. Using a carbon cleaner (any intake carbon cleaner should work, I was given some that I can’t remember the name of) and brush the carbon off, clean up any residue with some carburetor cleaner. I also used a piece of speedometer cable attached to a drill and stuffed it down the EGR port into the intake along with a ton of that carbon cleaner, whip it around real good. Follow up with carburetor cleaner. Replace EGR and IACV gasket while you’re at it.
After a test drive it seemed to clear up, but next day as soon as I got on the highway it started missing (although not as bad as before). Turned around, went home and used some SeaFoam Top Engine Cleaner, the results were instantaneous as soon as I got back on the highway. Passed SMOG with flying colors, even cleaner than the emissions test that was performed 6 months prior.
Overheating Condition
With the two previous tests out of the way, I was fairly confident the head gasket and engine block were intact. After topping off the radiator for the block test, engine warmed up, I noticed coolant dripping underneath the passenger side of the car. After having rebuilt the entire engine bay of my CB7 Accord, I knew this was likely from the heater hose. Sure enough, it was dripping from a tiny hole on the underside of the heater hose coming off the cylinder head beneath the distributor. I cut off about 1″ to get rid of the pin hole and reattached.
Why did this happen? I could see the distributor had been replaced with a new one. My guess is that the distributor oil seal failed (common issue) and leaked oil into the distributor, and down the side of the cylinder head onto the heater hose. Eventually contact with oil will cause the rubber hose to get spongy, swell, and in this case, leak. So replacing the heater hose is in order.
Electrical Issues
I was told the car would stall when coming to a stop. When I got it running, I didn’t have that issue at first, until my fuel level dropped below quarter tank. At first I thought, fuel pump – they lose the ability to pump fuel when the tank gets low because it doesn’t have the pressure buildup behind it from the weight of the fuel bearing down on it. Once you get to quarter tank, the weight of the fuel is less than if you were to have a full tank.
But it turned out that wasn’t the problem. (Or it was part of the problem)
After I replaced the fuel pump (and pick-up strainer), it didn’t stall anymore, but when coming to a stop, my battery light would come on, as well as the emergency brake indicator light. (video below)
Likely culprit was the cheap alternator that was recently installed, voltage regulator couldn’t compensate for the drop in RPM’s when coming to a stop and then trip the computer into thinking the engine was off. Within a few seconds the lights would turn off, no stall. The drop in voltage could also have attributed to the old fuel pump not delivering consistent fuel pressure, thus causing the stall.
So don’t cheap out on an alternator, get an OEM one, or at least a remanufactured OEM for reduced cost. Aftermarket alternators usually don’t play well with the cars electronics.
Door Lock Actuators

The driver and passenger side door locks won’t operate (or operate poorly) when using the key fob, or using the lock switch on the doors. The door lock actuators were tired and worn out, needing replacement. I picked these up (again, Amazon) to replace the bad ones. There are quite a few videos on YouTube for door actuators, but the symptoms include
- locking or unlocking once, then it won’t lock/unlock again for several minutes/hours (which was my issue)
- sluggish lock/unlock
- no lock movement at all (verify your fuses are good, and you have voltage at the connector when the lock is activated)
These were nice because they included the plastic keepers that snap into the door to keep the wires secured.
Power Steering Pump
Another issue was the power steering pump – it made a horrific noise worthy of my toddler when she wants to scream her head off.
Take a look at the power steering fluid reservoir – mine was bubbling. Also evident underneath it was that it overflowed from all the bubbling given the amount of oily residue I found.
Most likely cause: leaking gasket(s) in the power steering pump, sucking air into the system.
Solution: Get the rebuild kit, takes about 30 to 45 minutes and it’s not hard to do. Just take your time.
02/16/2023 Updates Below
Engine Oil Leaks
Oil leaks are very common with Hondas. The H22 is no different. You’ll find drips/streams on the back of the engine, and on each side. Here’s the most common places in the Base Prelude:
- Camshaft Seals
(front and rear, the rear is the distributor seal on the exhaust cam, and the rubber plug at the rear of the intake cam). When they leak they’ll drip behind the timing cover and wind up dripping from the timing cover underneath the harmonic balancer. - VTEC Solenoid Gasket
Usually gets blocked with dirt, preventing VTEC from kicking in. - Balance Shaft Seal
When this goes, it dumps oil out from under the timing cover - Oil Pump Seal
Usually hard and brittle - Crankshaft Seal
- Rear Main Seal
Appears as a drip between the transmission and the engine block. - Dipstick Tube O-Ring
You’ll see some seepage from around the base of the dipstick tube. - Oil Cooler O-Ring
The one leaks real bad and covers the back of the engine, and deteriorates the rubber cover over the oil pressure sensor. You have to remove the oil filter and unthread the threaded oil filter bolt for the cooler to come off. You don’t have to remove the coolant hoses to it, but it makes it easier if you do. - Oil Drain Plug Washer
If you have a few oil changes on the current drain plug washer, change it. It gets distorted more and more with each oil change and starts leaking - Oil Pan Gasket
- Valve Cover Gasket
Do the spark plug tube seals at the same time. They all come together in a valve cover gasket kit along with 8 new rubber seal washers. Be sure to use black RTV in the 8 corners (2 on each side of the cams) to prevent leaks between the cylinder head and valve cover. - Spark Plug Tube Seals
If you have oil in your spark plug wells, this is why. Do the valve cover gasket at the same time.
Automatic Transmission
Experiencing shift flare from 1st to 2nd gear when cold. Once fully warmed up it doesn’t do it. I suspect the filter screens are clogged and the fluid thins out when warm, making it easier to flow through. New dual-linear shift solenoid did not help. I adjusted the solenoid with the adapter tool and had mild results, not worth mentioning. Otherwise it shifts fine – so I’ll rebuild it with a shift kit eventually when it gives up, but it doesn’t show any sign of that happening soon.
Everyone says “manual swap it”. Pass. I’ve driven in heavy commute traffic for years with a manual, I’m over that. Besides, this transmissions not that bad. Rebuilding it with a shift kit to improve upon the original design, and use the Raybestos friction discs with the cross hatch pattern should prevent the issues in the future.
Catalytic Converter
At certain speeds I could hear a rattle, and above 5 to 10 MPH I hear a weird sound that is like a belt whooshing (only way I can describe it) so I was able to narrow the rattle down to the catalytic converter. The honeycomb material was rattling around in there like a marble, the mat that surrounds the material against the cat housing was completely gone. New catalytic converter – problem solved. And that whooshing sound is gone.
No VTEC!
Never noticed until recently that the VTEC wasn’t kicking in, and no CEL codes were being stored. There was an oil leak coming from the rubber plug at the intake camshaft, and the VTEC solenoid, so I took care of both at the same time. The VTEC solenoid gasket (with the little mesh screen) was slightly clogged with fine dirt debris, so I cleaned out the solenoid real well with carb spray and compressed air, fitted a new gasket and lo-and-behold, hit 5,000 RPM and it takes off even more like a bat out of hell.
Wheel Balancing & Tire gash
 I went to have my tires rotated and balanced to take care of a slight shimmy on the highway, the tire tech was able to balance the front two tires but showed me this problem with the rear passenger-side tire, which he wasn’t legally allowed to touch. Surprisingly it was holding air just fine, the cut was clean down to the kevlar belts.
So I got a new tire, balance and rotation was done, no more shimmy.
Side note: I love these tires. Tires/rims came with the car from previous owner. Yokohama Advan Sport AS+ on Konig Flow Formed 17″ rims.
Cabin Air Filters

 I was looking up engine air filters when I came across available cabin air filters, never noticed there was a spot for this as the access door is partially covered up by the cross member that holds the glove box, and behind that is a plastic piece (probably for fitment when the dash is installed at the factory) which has to be cut in order to remove the access door and slide the two filter elements out.
These babies were original, and nasty. Compacted, full of debris. With some still in the air duct that vacuumed right out. Luckily no mouse nests. A/C airflow is much improved.
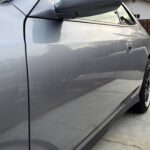
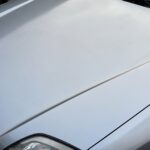
Paint
Paint was in fairly good condition with some oxidation spots, one 6″x6″ area on the hood, and some along the roof above the rear window. I decided to do some paint correction but I had mixed results in the past with generic $40 buffers, it could’ve been my technique. After watching some YouTube videos I decided on the Chemical Guys TORQ Random Orbit polisher. This thing didn’t disappoint, I highly recommend it. The included sampler bottles of cutting compound and polish are pretty impressive, the results were equally impressive. I also used a foam cannon to give the Prelude a sudsy bath before polishing. Add some microfiber towels, you’ll be happy you did.
For soap, Meguiar’s Gold Class works great with the foam cannon. Use a 10:1 mix.
Clay Bar your paint before polishing to remove any contaminants left behind after washing.
For wax, I’ve always been a fan of Meguiar’s products so I went with what I know. Their Ultimate Liquid Wax can be used with a buffer, I applied it by hand using the included applicator, then it sits for 5 to 10 minutes to dry then use the buffing (black) to remove. The paint came out smooth as glass (pictures below).


This YouTube video from Chemical Guys will explain how to use the polisher.
Add-ons
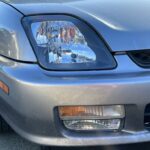
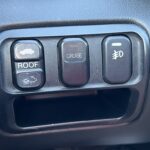
Refresh the headlights – I still wasn’t pleased with the light output from the stock headlights after cleaning them and using a ceramic coating. And the black insert below the turn signal wasn’t very appealing, so new headlights and foglights have been added. I put the switch in place of the dimmer knob (which I tucked out of the way behind the dash – I never need to adjust the lighting so it was fairly inconsequential). And I didn’t like the moonroof switch in the middle, so I swapped it with the cruise control button.
The Spec-D Tuning headlights turned out great, easy to install. The foglights from ACANII fit “ok” – took some finagling, using a step drill bit to make a hole to pass the wiring harness through, and seal it up with a grommet. And the instructions don’t tell you what the green wire coming off the switch does, but after some testing that is the trigger wire and it needs a 12V(+) input.
Replace the factory stereo with an updated touchscreen
Wireless CarPlay! Replace your speakers while you’re at it, new stereos use a different speaker impedance and you’ll need to bypass the acoustic feedback system amp (AFBS) so the rear speakers function correctly. The process is outlined here on PreludePower.com
For speakers, I went with 6.5″ for the doors and 6″x9″ for the rear, keeping the Honda tweeters for now.
I had to modify the 6.5″ to fit even though they were suppose to drop right in. You don’t need to remove the whole door panel, just pop the speaker bezel cover off carefully. It’ll snap right back in.
The rear 6″x9″ fit perfectly.
Get your speakers here
You’ll need a dash kit to secure the new stereo into the dash.
Also add a tire pressure monitoring system, sits nicely on the steering column.
Leave a Reply